The Cheat Sheet: 8 Easy to Learn Pain -Free Exercises To Get You Started
Author - Stephen Griffith C.S.C.S
Last week I met with Sarah, a woman in her late 40s who has never worked out and was looking to lose weight, build strength, and most importantly not hurt herself.
She tried reading magazines and workout programs she found online but with little success. The issue is she always had to stop the workouts because her knee would start hurting.
She was meeting with me because she needed a place to start.
No problem, I thought. Until she mentioned she was moving and this would be her only session.
This presented a dilemma-
How do I set this woman up with a training program she could confidently do on her own; and teach it in only 40 minutes?
Over the course of my training career, I’ve come across several exercises that are simple, effective, and low risk. They're my cheat sheet for working with clients who have injuries or little experience exercising. So when it came to building Sarah a program, I pulled out my cheat sheet and got to work.
Below are the 8 exercises I chose, which you too can use to get started. Together they make a workout that addresses strength, posture, core stability, mobility, and work capacity, all while being simple to learn and perform on your own.

May 2019 Addition - Incline Treadmill Walking
Plank
Directions: Place the forearms on the ground with the elbows aligned below the shoulders, and arms parallel to the body at about shoulder-width distance. Then lift your body off the ground and hold your body in a straight line. Don't let the hips fall or rise.
The plank is my starting place for testing and building a basic level of core strength, teaching how to engage and brace the deep core musculature, holding your spine in alignment and breathing under tension.
The core muscles act as a corset around the waist sucking everything in. This helps support the muscles of the back and create a narrower waist.
The Plank is a simple exercise but has a few areas where one could perform it wrong. So keep the following Cues in mind as you perform it.
Keep the body level- the hips should stay level not too high and too not low. One way to get the right position is to raise your hips too high, then too low, and then find sweet spot in the middle where you feel it in your tummy. You may use a mirror to check your position.
The plank is an exercise you should feel in your “tummy” area - not in your back. If you feel pain or sensation in your lower back, then it is a sign that your spine is sagging out of alignment. This occurs when you fail to engage the core muscle.
To make sure the core is engaged focus on squeezing your butt and pulling your belt buckle up towards your chin. For tips on how to engage your core and keep your spine in position go to -
A Straight Back is a Safe Back - a Guide to Maintaining a Neutral Spine
If you feel yourself losing position and you can’t readjust then stop the exercise, rest, and try another set. It is better to do multiple shorter sets with good form than any sets with poor form.
Build up to a 1 minute quality plank then look to increase the difficulty.
Glute Bridge
Directions- Lay on your back with knees bent and heels about a foot away from your but. Engage the core, push through the heels, and lift your butt off the ground while focusing on squeezing the butt.
The glutes or in less sophisticated terms - the butt muscles, are some of the most powerful muscles in the body. More than aesthetics, strong glutes provide power, performance, and posture. They are key to living a pain-free existence.
If you are someone who sits for several hours a day- then you may suffer from gluteal amnesia. Gluteal amnesia is a term low back expert Stu McGill coined to describe a lack of glute activation after periods of disuse. Simply put - If you don’t use em, you lose em.
Weak glutes can contribute to back pain, tight hamstrings, and knee pain. You can avoid these negative effects by consitently exercising your glutes during workouts. The glute bridge is a great starting point for isolating and reactivating the glutes.
Farmer Carry
Directions - Carry a weight in each hand with good posture.
Carries are a simple exercise that provides a lot of real life benefits. You’ll notice a difference the next time you go grocery shopping, take out the trash, or do your laundry.
It builds grip strength, hip stability, core strength, posture, and work capacity.
Modifications - While the farmer carry is the simplest to perform, there are several other helpful variations such as:
The Suitcase Carry - Carry a weight in 1 hand while maintaining posture
The Goblet Carry - carrying a weight in front of the body - and
The Heartbeat Carry- a modification of the goblet carry where you press the weight out and back like a beating heart as you walk.
Sit to Stand / Box Squat
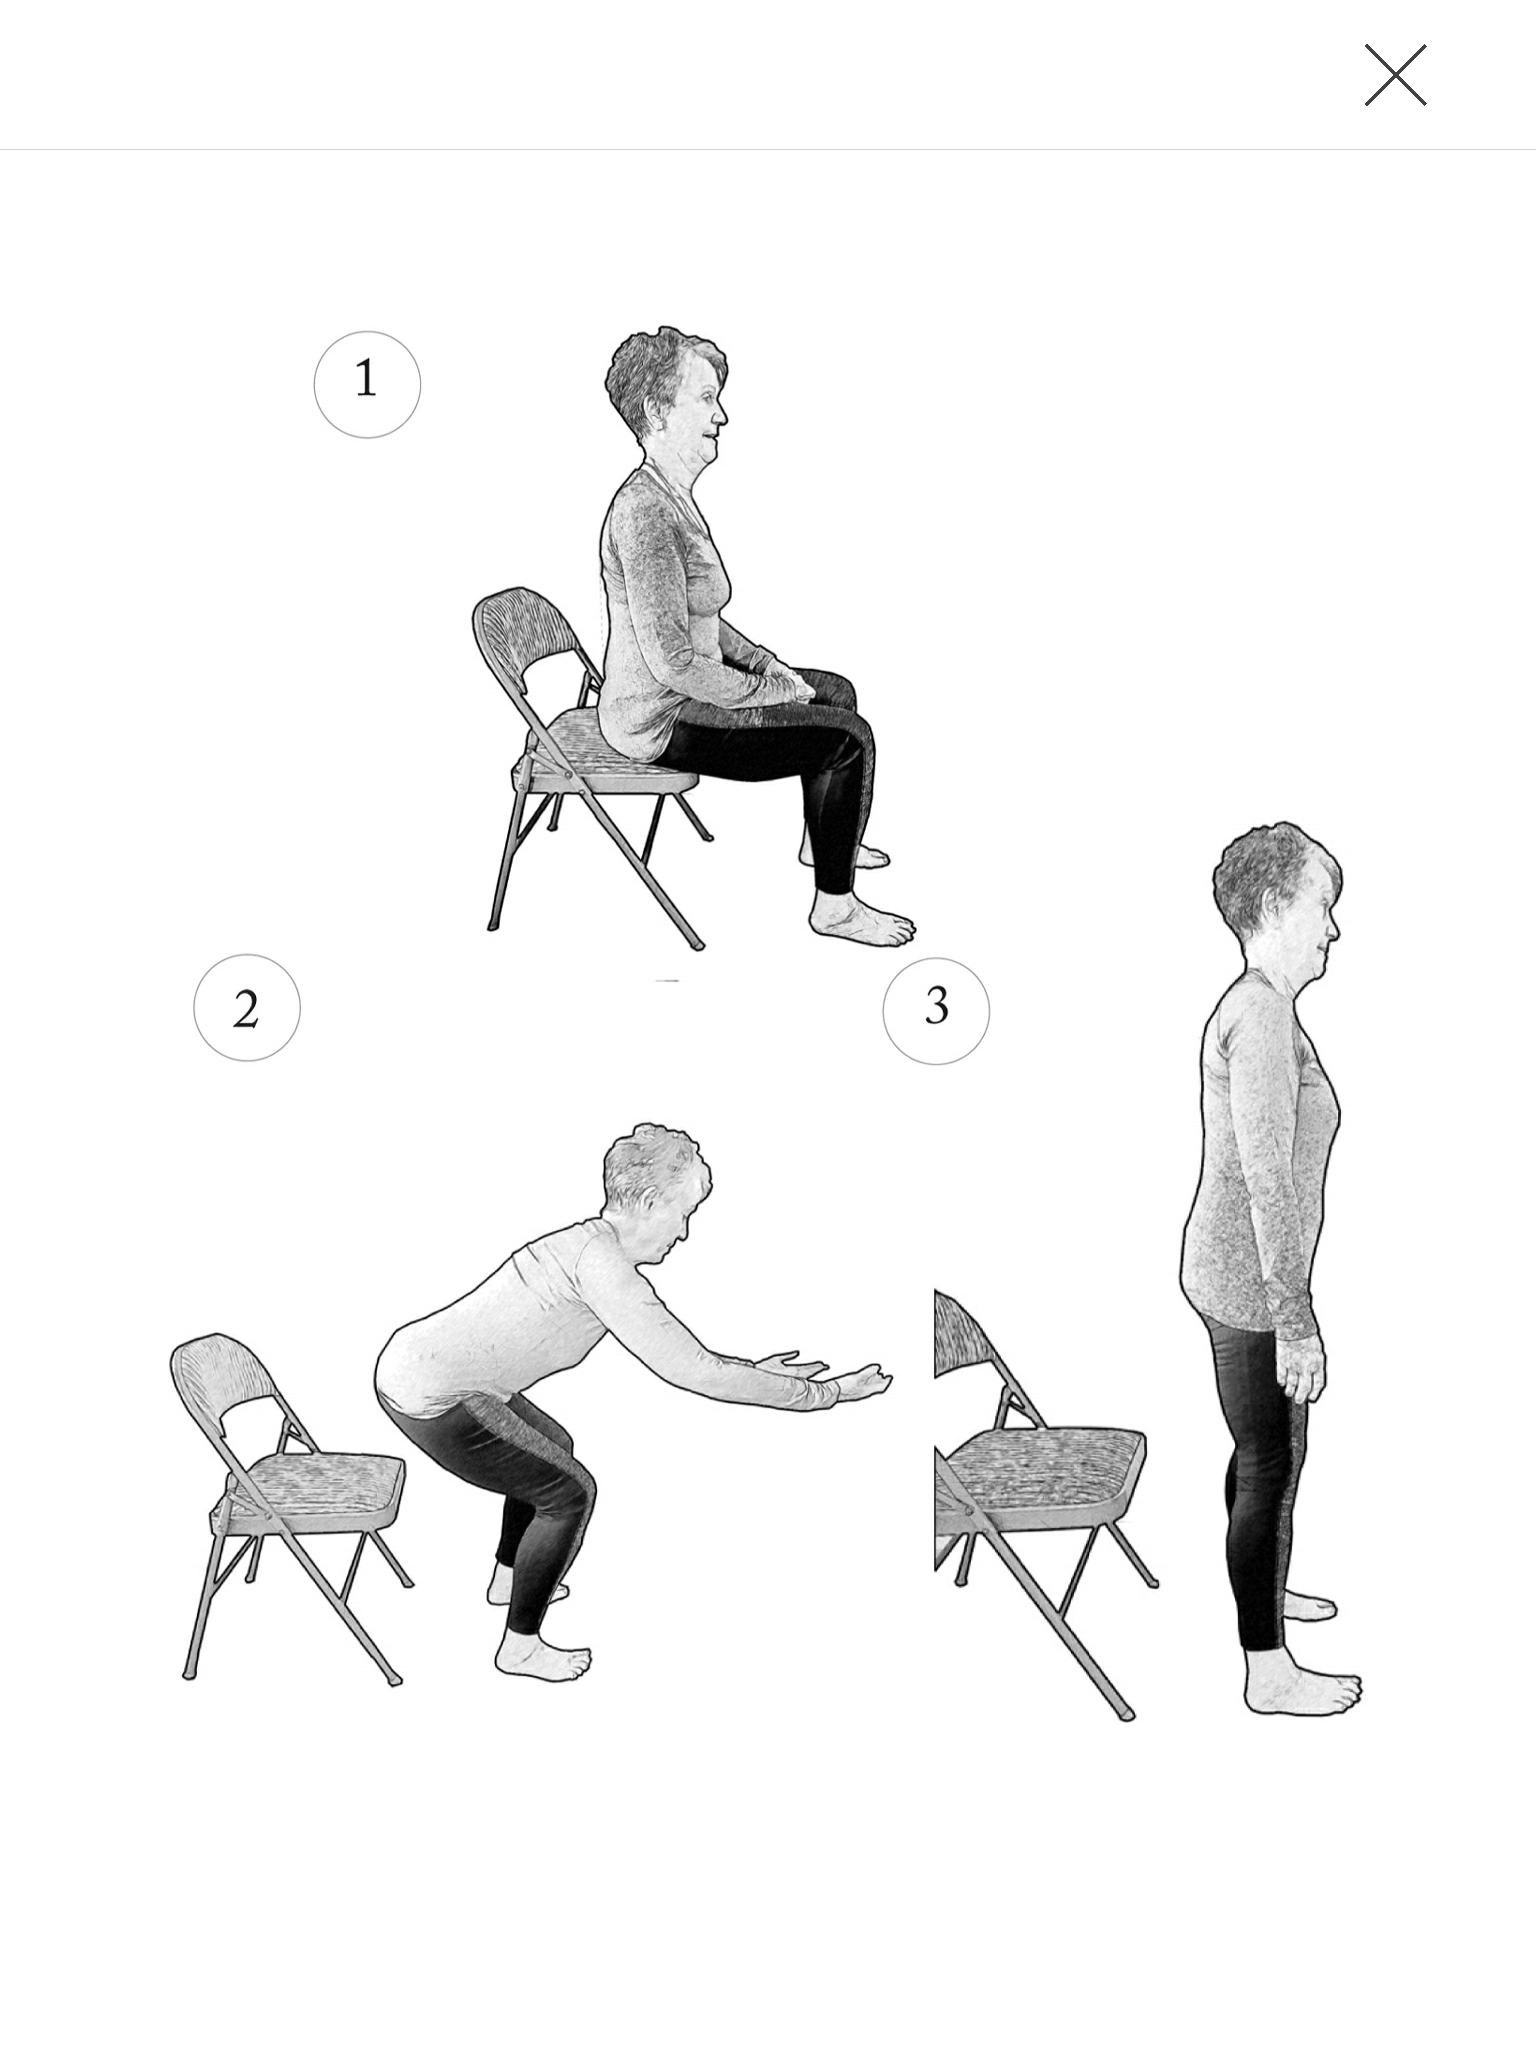
Shelah M. Wilgus - From Dynamic Aging: Simple Exercises for Whole-Body Mobility
Directions - Find a box, bench or chair - the height of the chair can be lowered to increase the difficulty or raised to decrease difficulty. Now sit down and then stand up. That's the jist of it.
Coaching Cues -
Keep the Shins vertical and push the hips back as you sit down.
As you stand, lean forward at the hips - do not round the back.
Keep the weight on your heels
Avoid using momentum
Use your legs to stand up.
The squat is a fundamental exercise that works nearly every muscle in the body primarily the muscles of the lower body such as your quads, hamstrings and butt.
The box squat or sit to stand is a great starting place for building strength and learning the movement without risking injury.
If you are someone who is older or suffers from knee pain the box squat is beneficial because it will limit the amount of stress put on the knee compared to standard squats.
Likewise, focusing on using your legs, keeping the spine straight, and avoiding momentum is an effective way to reduce lower back pain.
Progression - The sit to stand can be progressed to the Box squat. The mechanics are the same but instead of sitting down you will tap your butt to the box and stand back up.
After that variation you can add more knee flexion and progress to a standard goblet squat. I’ll often keep the box as feedback that your going deep enough even for my athletes.
Get Back Ups
Directions: Get down on the floor, then get back up.
The get back up is a simple exercise I picked up from strength coach Dan John.
To be honest I disregarded it the first time I read about it until I was working with some of my older clients.
Getting off the ground is a fundamental movement that declines as we age. However, it’s benefits are not just for the elderly because getting up and down off the ground is a great way to burn calories and get the heart pumping.
This exercises becomes interesting when you realize that there are many ways to get up and down off the ground. Experimenting with different techniques is a great way to improve your mobility and coordination. I like to start my days off with the sequence below.
Basic Sequence
To start, get on the ground in each position - Belly, back, left side, right side, and a plank position - and then back up.
To add a challenge and increase the complexity of the exercise we can put restrictions on the movement.
For example, put your right hand on your right knee and perform the sequence above. Under no condition should your hand come off your knee. Every time it does a puppy dies. Spare the puppies!

Pro Tip: If it feels hard and awkward then I assure you that there is an easier way to do it. Keep Trying.
If you have injuries or limited movement then this is a good video for going over a simple technique for getting on and off the ground.
https://www.youtube.com/watch?v=lwVhl04v0E4
Pallof Press
Directions : Set up perpendicular to a cable or band and hold the handle close to the chest. Push the handle out in front of you, then pull it back to your chest. That’s 1 rep. Variation: Assume a half kneeling position: One knee down, and one knee up with both knees form right angles and perform the same exercise.
The Pallof press is a great exercise at teaching hip stability, core tension, and working the obliques. While the plank works the anterior(front) core muscles, the Pallof press trains the rotational muscles (obliques). Perform the exercise slowly for full benefits.
While standing is the easiest to understand, I suggest starting in the half kneeling position with the outside leg up. This will allow you to build stability in a split stance position which will be beneficial if you’d like to progress to single leg exercises. (which you will.)
Band Pull Apart
Directions - Hold a band out in front of you like Frankenstein, grasping one end in each hand. Pull the band apart till it touches your chest and reverse the motion. Keep the shoulders down so they don’t shrug up and focus on pulling the shoulder blades together as you pull.
When we sit all day causing our shoulders, to round, back to hunch, and neck to tighten up. muscles get weak and cause our shoulders to roll forward and our backs to hunch over. The pull apart is a great exercise for strengthening the muscles of the upper back and reversing that forward drift. I advise all of my clients to keep one at their desk and perform pull aparts periodically during the day.
Incline Treadmill Walking

Ski Pole Optional
Cardio is important and any well-rounded program for health should include it.
Cardio helps to lose or manage weight, improve heart function, lung capacity and reduce your risk of cardiovascular disease, diabetes, cancer, and high blood pressure.
If your someone with preexisting injuries or who are deconditioned cardio exercises can present issues. The issue with most cardio exercises is that they are continuous repetitive exercises which can break down the body if you have an injury or improper form.
Cycling is great if you can fit the bike properly to your body. Elipticalling can be a great entry point for many people however it lacks functionality for activities of daily living. Running is great, but without proper form, the pounding could be too much.
My favorite though is walking. Walking is a fundamental movement that rarely causes injury or issues. IT is load bearing to help strengthen your bones, puts little stress on the knees, can be done anywhere, anytime, and doesn't subject your joints to repletive pounding.
Now the one issue one may face is intensity. If you want to improve your cardiovascular function, it’s necessary to get your heart rate up.
To achieve this, walk faster. The best speed to walk for a workout is between 3 and 5.5 miles per hour. Faster than a stroll but not quite a run. As you increase your speed over 3mph walking becomes very inefficient.
What do you do when you need more of a challenge? Walk uphill.
I have many clients for whom running would do more harm than good. Most people like those who suffer from knee pain it’s going down that causes issues. Going up however rarely causes pain or injury while dramatically increasing the challenge of the exercise.
So find a speed between 3 and 5 mph and increase the grade each workout.
Chart of estimated energy efficiency at various walking and running speeds
Putting It Together
If you're not moving, you need to be. Above I’ve listed 7 of my favorite foolproof exercises. These are exercises that most can do with little to no previous experience or feedback. They are exercises which are simple to grasp, difficult to mess up, and rarely, if ever, cause pain. They’re my go to exercises for getting people moving in a hurry.
When we combine these exercises, we can create a great low risk way to get moving. This is a workout that will get the right muscles activated and help create a foundation to build on.
5 Rounds
Plank - As long as you can hold with good form - Aim for up to 60sec
Glute Bridge - 10 Reps with a 2 second pause at the top to squeeze the glutes
Sit to Stand - 10 Reps Focusing on using the legs
Band Pull Aparts - 10-20 Reps
Get Back ups - 1 set - front, back, left side, right side, plank - Start with no restriction and each round move on to the next restriction.
Pallof Press - 8 Reps each side
Farmer Carry - Pick a length and A weight you can carry 30s-1min - should be on the heavier side. (substitute Heartbeat or suitcase carry to perform at home or for variety
Follow with 20 min Incline Treadmill Walking at a decent pace.
Resources
Disclosure: This post contains affiliate links below, which means that if you click on one of the product links, we will receive a small commission for it. This revenue is important for allowing the website to operate and continue to produce quality materials for you our reader. With that said all items listed in this article I have personally used and recommend because I feel they provide a real benefit for you.
Resistance Band Set - good for using for pull aparts, pallof press, and other exercises not mentioned here on this list.